DTMF Release Mechanism for HAB
In the latest installment of the USMA Weather Balloon, I will go over a module that didn’t quite make it on. We planned on having a release mechanism for the balloon using a servo and specialized hardware, but scrapped it due to launch concerns. Strap in once again!
Radio Module
This was one of my first attempts using FR-4 Perfboard for a project. It greatly saved time and headaches through the PCB design phase, but was frustrating when soldering in so many wires. For repeatable efforts, sharpen the saw and print PCBs if you can.

The DTMF Board
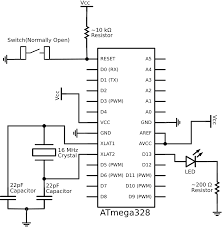
All in all, this board takes an input 6-18V, has a toggle switch, and runs a barebones Arduino connected to the HamShield Mini. Here is the schematic for a barebones arduino:

Barebones Arduino
The Crystal frequency can be anywhere 10-20 MHz; I think the one in the design is close to 12 MHz. After this IC is soldered, the HamShield connects to VCC, GND, DAT, nCS, CLK, and MIC pins as specified in the code. The servo connects to another 5V (worked just as good as 6V) and GND, but its yellow cable connects to a specified PWM pin, 9 in our case. Follow with the code and you should be set. Note the servo has female header pins to terminate its cable, so I soldered Male Header pins on the board.
Code
The code is almost a direct copy of my work years ago on this DTMF-controlled LED. However, small improvements allowed me to both move the servo forwards and backwards for testing purposes. In a real environment, I should only have to move the servo once. Code here.
if (radio.getDTMFSample() != 0) {
    uint16_t code = radio.getDTMFCode();
    if (code == 1) {

      pos = pos-90;

      delay(1000);

    }
      if (code == 2) {

      pos = pos+90;
      myservo.write(pos);

      delay(1000);

    }

    }
If I type “1”, the servo moves counter-clockwise 90 degrees. “2” moves it clockwise. I recommend characterizing the initial start position and the direction that the code actually moves the servo.
Archery Release
Using this online post as a guide, I found archery releases on ebay for about $9. A quick expedited shipping let us all test the device. I was disappointed to find the movement to be more of a shear movement than a parallel action, meaning we had to get creative with the servo movement.
We actually settled on having the servo mounted horizontally and “tugging” diagonally to pull on the archery release. However, this created several problems. First, the archery release had to be suspended above where the servo was, leading us to make an odd layer-cake of mounts for either device. Next, if our paracord pulled in any direction, our trigger would be released and cut the load. We will describe this more later.
Test
Below is a test of our archery system. It worked! But not in the test environment of jet streams, take offs, and landings.
https://www.youtube.com/watch?v=1eBU3P6ppD0
DTMF Test!
Failure
Eventually, we had to abandon ship on this project. The night before the launch, we realized our parachute had to place to go between the payload and balloon string; the servo would end up releasing the chute as well as the balloon. Without any quick engineering to find a suitable place for the parachute, our release mechanism had a chip on its shoulder. Even further, from more stress analysis we found any sort of lateral wind movement would trigger the release and send our balloon up without any payload attached.
It was a tough and hard-fought decision, but one that made us all go to bed a little easier.
Conclusion
Although the design was a good proof-of-concept, it needs a bit more engineering before it is ready for a payload. I plan on using work from EOSS and their nichrome wire releases for future launches, since an error in the nichrome does not spell doom for the entire payload.

DTMF Installation
I wonder where we can go from here with the DTMF-controlled servos. Balloon controls perhaps? Auto-landing? Telemetry commands via APRS messaging? The possibilities are endless!